How to Hide Cables Under Your Desk (The Clean Setup Guide for 2026)
Disclosure: This post contains affiliate links. If you buy through our links, we may earn a commission at no extra cost to you.
The average desk setup has 11 cables. Most people manage zero of them. Not because they don’t care — but because every method they’ve tried has failed within two weeks. If you’ve ever wondered how to hide cables under desk without spending a weekend redoing everything, the answer isn’t a better product — it’s the right method for your specific desk type. You spend two hours organizing everything perfectly, then add one device, and it’s chaos again. That’s not a motivation problem. It’s a method problem.
This guide breaks down four cable management approaches by use case — under-desk trays, J-channel raceways, Velcro ties, and adhesive clips — and tells you exactly which one fits your setup. You’ll also learn why standing desks require a completely different strategy, and why the most effective first step has nothing to do with cable management hardware at all.
What you’ll learn: The mechanical reason most cable solutions fail within days, which method maps to which desk type, and how to build a system that survives adding new devices. This guide covers renters, standing desk users, and permanent setups equally.
How to Hide Cables Under Your Desk: Why Most Methods Fail Within a Week
Most cable management solutions are designed for a static desk. Real desks are dynamic. You add a new monitor. You swap a keyboard. You plug in a phone charger that wasn’t part of the original plan. The system you built for seven cables now has nine, and three of them don’t reach the tray you mounted.
There are three mechanical failure modes that explain nearly every cable management collapse:
- Overcapacity. The tray or raceway was sized for the cables present at install time. One new device overflows it. Most people then abandon the system entirely rather than expanding it.
- Adhesive failure. Products that rely on surface adhesion — clips, raceway strips, cable holders — are rated for flat, clean, dry surfaces. Desk undersides are often textured, painted with low-adhesion coatings, or subject to vibration. Adhesives that hold for two days at room temperature start failing within two to three weeks with thermal cycling.
- Tension mismatch. On standing desks, cables that are properly managed at seated height go taut or pull free when the desk rises. This is the most common failure mode reported by standing desk users, and it requires a fundamentally different approach.
The fix isn’t buying better products. It’s matching the method to the specific constraint. That’s what the sections below do.
Method 1 — Under-Desk Cable Tray (Best for Most Setups)
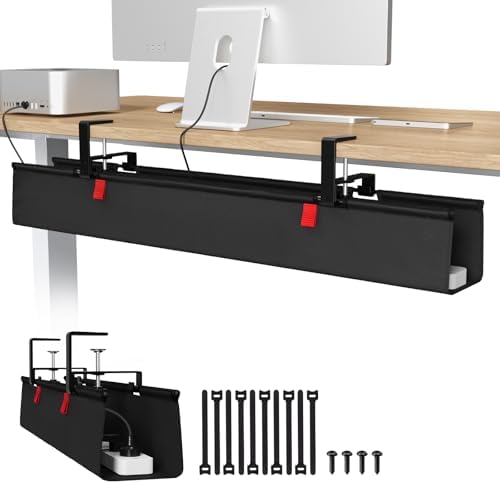
An under-desk cable tray is a basket or shelf that mounts to the underside of your desk and holds cables, power strips, and adapters off the floor. It’s the highest-capacity, most stable solution available for fixed-height desks.
How it works: The tray clamps or screws to the desk frame. You lay your power strip flat inside it, route all cables through or alongside, and the entire bundle disappears from view. From the front, the desk surface looks clean. From the side, nothing is visible below knee height.
Why it works long-term: The tray’s capacity is measured in volume, not cable count. You can add devices without the system breaking. The power strip lives inside the tray, which means you’re not managing individual cable lengths — you’re managing one tray exit point.
Best product: The Univivi Under-Desk Cable Tray (ASIN B0DK13ZHNJ) uses a no-drill clamp mount, making it compatible with desks where drilling isn’t practical. It holds 4.7/5 across 519 reviews — the consistent praise is for the clamp mechanism and tray depth.

Setup process:
- Clamp the tray to the underside of the desk at the rear center or rear corner — wherever your cables naturally converge.
- Mount your power strip inside the tray using the included Velcro or zip tie points.
- Route all device cables to the tray from the rear of the desk surface.
- Use a single cable run from the tray to the wall outlet. This is the only cable that remains visible, and it can be hidden with a floor raceway.
Limitations: Not suitable for standing desks — the fixed mount creates tension during height changes. Works best on desks 24 inches deep or more, where there’s clearance behind monitors.
Method 2 — J-Channel Raceway (Best for Wall Routing / Renters)
A J-channel raceway is a plastic channel that mounts to a wall surface and conceals cables running along baseboards, desk legs, or wall edges. It’s the correct solution for renters who can’t drill, and for setups where cables need to travel from the desk to a wall outlet without crossing open floor.
The renter problem: Most cable management requires drilling into walls or desk frames. J-channel raceways with Command Strip mounting avoid this entirely. You apply the adhesive strips to a clean surface, press the raceway in place, and route cables inside. When you move out, the strips remove without wall damage.
Best product: The Delamu J Channel Raceway (ASIN B08JLPMPRM) holds the #1 bestseller rank in its category. It uses self-adhesive PVC with paintable surfaces, meaning it can match wall color if needed. The J-profile accommodates multiple cable sizes simultaneously.

Setup process for renters:
- Clean the wall surface with isopropyl alcohol. Wait 10 minutes before applying adhesive.
- Plan the route from the desk leg down to the baseboard and along the wall to the outlet.
- Apply the J-channel in sections, using Command Strips for the vertical desk-leg run and the included adhesive for the baseboard run.
- Route cables inside the channel. For multiple cables, use the largest J-channel size available — undersizing is the most common installation error.
- Snap the channel cover closed.
Paint matching: If the wall is white or off-white, standard white raceway is invisible at normal viewing distance. For other wall colors, paintable raceway takes standard wall paint after a light sanding.
Limitations: J-channel doesn’t solve desk-surface clutter — it only addresses the wall-to-outlet run. Pair it with a cable tray or Velcro management on the desk itself for a complete solution.
This method also integrates well with a clean WFH desk setup approach — routing the wall run before mounting monitors prevents the need to redo the wall section later.
Method 3 — Velcro Ties + Cable Spine (Best for Standing Desks)
Standing desks require a different mechanical approach. Cables must accommodate 12–18 inches of vertical travel without pulling taut, disconnecting, or creating tension that stresses the desk’s lift mechanism. The solution is a combination of Velcro bundling and a cable spine or management sleeve designed specifically for height-adjustable desks.
Why Velcro over zip ties: Velcro ONE-WRAP ties are reusable, gentle on cable insulation, and easy to adjust when you add or remove devices. Zip ties cut into cable jackets over time, are permanent once applied, and require replacement every time the bundle changes. In every practical comparison, Velcro wins on maintainability. The VELCRO ONE-WRAP Cable Ties 100-pack (ASIN B001E1Y5O6) costs approximately $9–11 and provides enough ties for multiple bundles with spares.
The cable spine: A cable management spine — also called a cable caterpillar or retractable cable sleeve — is a flexible accordion-style channel that expands and contracts as the desk moves. Cables run inside it. The spine mounts at the desk frame and hangs in a loop that takes up slack when seated and extends when standing. This loop design is the critical differentiator from flat cable sleeves, which create dangerous tension.
Important warning: Standard flat cable sleeves — the braided or neoprene tubes commonly sold as standing desk accessories — do not solve the tension problem. They bundle cables together, which makes the problem worse. When the desk rises, all cables pull as one unit rather than individually. Use an accordion-style spine or a retractable system, not a flat sleeve.
Setup process:
- Use Velcro ties to bundle cables into two or three logical groups: monitor cables, peripheral cables, power cables.
- Route the bundled groups into a cable spine. Leave 20% extra slack beyond what the full height travel requires.
- Mount the spine’s upper end to the underside of the desk frame near the rear edge.
- Allow the spine to hang in a natural loop down to the floor or to a cable tray mounted at mid-height on the desk leg.
- Test the full range of height motion before mounting permanently.
For a complete guide to standing desk accessory setup, the best standing desk converters roundup includes cable management considerations for converter-style setups — worth reading before buying hardware. UPLIFT Desk also publishes a detailed standing desk cable guide that covers their specific mounting systems.
Method 4 — Adhesive Clips (Avoid Unless Temporary)
Adhesive cable clips are small plastic hooks with adhesive pads that stick to surfaces and hold individual cables in place. They’re sold in multipacks for under $10 and are the most commonly purchased cable management product on Amazon.
The problem: Adhesive clips fail within 2–3 weeks under normal conditions. The failure mode is consistent: the adhesive pad separates from the surface, the clip releases, and the cable falls. The pad leaves a sticky residue that attracts dust and is difficult to remove cleanly from desk surfaces and walls.
At higher temperatures — common in rooms with direct sunlight or near desktop computers — adhesion fails faster. Under the underside of a desk, where temperatures spike near power supplies and where surfaces are rarely cleaned, two weeks is an optimistic estimate.
When they’re acceptable: Temporary routing. Running a cable for a single event, a guest setup, or a short-term project where permanence isn’t required. In these cases, the low cost and zero-tool installation is appropriate. Do not build a permanent cable management system on adhesive clips.
Better alternatives at the same price point:
- Velcro ties bundled through a single anchor point outperform a dozen adhesive clips and cost the same.
- A single J-channel segment with proper adhesive installation holds for years where adhesive clips fail in weeks.
Pro Tip — Go Wireless First, Cable-Manage Second
Before purchasing any cable management hardware, count your cables. Then identify which of them connect peripherals that have wireless equivalents.
The most common cables on a standard desk:
- Keyboard cable
- Mouse cable
- Webcam cable
- Headset cable
- Phone charging cable (if running to the desk surface)
Replacing these five with wireless versions — Bluetooth keyboard and mouse, USB-C webcam on a short hub, Bluetooth headset, wireless charging pad — can reduce cable count from 11 to 4–6. At that point, a single Velcro tie bundle plus a cable tray handles everything. The system is simpler, more maintainable, and less likely to fail when you add a device.
Cost consideration: A wireless keyboard and mouse combination costs $30–60 at mid-range. A cable tray costs $25–40. If the wireless switch eliminates the need for a raceway installation ($20–40 in materials plus 2 hours of labor), the economics often favor going wireless first.
USB receiver consolidation: If switching to wireless peripherals, use a single multi-port USB hub mounted to the underside of the desk. Run one USB cable from the hub to the computer instead of three or four individual receiver cables. This is the wireless equivalent of routing through a cable tray — one exit point for the entire bundle.
What wireless doesn’t replace: Monitor cables (DisplayPort, HDMI, USB-C video), power cables, and ethernet if you’re hardwired. These require physical management regardless. But reducing the peripheral count first means the remaining hardware problem is tractable.
The Standing Desk Problem Nobody Warns You About
Standing desks have a cable management problem that fixed desks don’t have, and it’s more significant than most setup guides acknowledge. It deserves its own section.
The core issue: A standing desk in seated position has cables running down the leg to the floor, roughly 28–30 inches of vertical drop. In standing position, that drop becomes 42–48 inches. The 14–18 inch difference must be accounted for in every cable that bridges the desk surface to the floor or wall. If it isn’t, cables either pull taut — potentially damaging connectors — or create dangerous floor-level slack when seated.
The tension failure mode: A DisplayPort cable running from a monitor to a desktop tower on the floor looks fine in seated position. In standing position, it’s 16 inches short. Over time, the cable pulls on the port, loosens the connection, and eventually damages either the cable or the port. This is a slow failure that most users don’t connect to cable management — they assume the cable or port is defective.
The slack failure mode: Adding extra cable length to accommodate standing height means 16+ inches of slack on the floor in seated position. This creates trip hazards, collects dust, and looks exactly like the cable chaos the user was trying to eliminate.
The correct solution involves three components:
- Accordion cable spine: As described in Method 3, this accommodates height change without tension or floor slack. It’s the primary structural solution.
- Cable-to-desk anchoring: All cables should be anchored to the desk frame at the rear edge using Velcro ties. This means the desk frame — not the cable connectors — absorbs any residual tension during height change.
- Floor-level cable management: Any cable that terminates at a floor-level device (desktop tower, network switch, power strip on the floor) needs a floor raceway or cable cover to manage the slack loop safely.
The setup sequence matters: Install the cable spine first. Then anchor cables to the desk frame. Then manage the floor-level run. Doing it in the wrong order — common when following generic cable management guides — results in a system that looks good at seated height and fails immediately at standing height.
Desk-mounted power strip: The single most effective standing desk cable management upgrade is moving the power strip from the floor to the underside of the desk. Mount it in a cable tray attached to the desk frame. All device cables now terminate at desk level, and only one cable — from the tray-mounted strip to the wall — crosses the height-change zone. That one cable runs through the spine. Everything else is static.
FAQ
What is the best way to hide cables under a desk without drilling?
A no-drill under-desk cable tray with a clamp mount is the most effective option for desks where drilling isn’t possible or preferred. The Univivi Under-Desk Cable Tray uses a clamp mechanism that installs without tools and supports full cable management capacity. For the wall-to-outlet run, use a J-channel raceway with Command Strip mounting — no drilling, removable without damage. The combination handles both the desk surface and the wall run without permanent installation.
How do you hide cables on a standing desk?
Standing desks require an accordion-style cable spine (sometimes called a cable caterpillar) rather than a static tray or sleeve. The spine mounts to the desk frame and accommodates 14–18 inches of vertical travel without creating tension. Pair it with Velcro ties to bundle cables before routing them into the spine, and anchor all cables to the desk frame — not to the spine itself — so the frame absorbs movement rather than the cable connectors. Avoid flat cable sleeves on standing desks; they bundle cables together and make tension worse.
Are cable management sleeves worth it?
For fixed-height desks, braided cable sleeves are a low-cost way to bundle cables into a single visual unit. They’re worth using when the cable run is static and the sleeve can be routed along a desk leg or wall edge. They’re not worth using on standing desks — the sleeve creates a rigid bundle that pulls as one unit during height changes. For standing desks, use Velcro ties and an accordion spine instead. For all desk types, sleeves don’t address the root cause of cable clutter; they conceal it. Use them as a finish layer after routing and anchoring, not as the primary management method.
Conclusion
Cable management fails when the method doesn’t match the desk type. Under-desk cable trays work reliably on fixed desks and should be the default choice for most setups. J-channel raceways solve the renter problem without drilling. Velcro ties and accordion spines are the correct approach for standing desks — nothing else handles the height-change problem cleanly. Adhesive clips are a short-term patch, not a system.
The sequence that works: reduce cable count through wireless peripherals first, then choose the management method that matches your desk type, then install it once correctly rather than repeatedly improvising. Label both ends of every cable before routing. Test the full range of motion on standing desks before finalizing any mount.
A clean desk setup isn’t the result of buying the right product. It’s the result of building a system that can absorb change — a new device, a reconfigured layout — without collapsing. The methods above are designed to do that.
Deixe um comentário